How To Change Your Wireless Channel

We're dependent on WiFi for our home entertainment, and for many of us, our work. When your WiFi is well-optimized and performing highly, you barely give it much thought at all. However, you certainly notice when the opposite is true. Poorly performing WiFi can be incredibly frustrating and stop you from getting on with your day.
But why does this happen? One of the main culprits is the wireless channel. If you live in an area with many routers, for example, a flat or a close-quarters neighborhood, these routers will compete for space. WiFi was designed with this in mind, and that's why your router has several different channels. Some routers are smart enough to take the initiative and change the channel for you, but many are not. Some routers will be pre-programmed to use one or a few channels and won't know to switch when things become too noisy. But don't worry, changing the channel manually is straightforward and simple with wireless channel scanners like NetSpot.
Which Wireless Channel Should You Use?
We typically describe WiFi as 2.4 GHz or 5 GHz, and while this is technically true, it's also true that there's more going on under the surface. 2.4 GHz WiFi runs from roughly 2400 MHz to 2500 MHz and is split into 11, 13, or 14 channels, depending on where you are in the world. The reason why not all channels are equal is because of interference, specifically, co-channel interference.
The 2.4 GHz band is only 100 MHz wide, but each wireless channel is around 20 MHz wide, and there are 11+ wireless channels. What does this mean? Overlapping happens between the wireless channels. The only channels that don't overlap with each other are channels 1, 6, and 11. By selecting one of these channels, you should experience the least interference and enjoy a more stable and reliable internet connection.
But what about 5 GHz? If you prefer to use 5 GHz WiFi to experience the benefits of a stronger connection in a smaller area, then you have even more channels to chose from. There are 23 or 24 non-overlapping 20 MHz channels on the 5 GHz WiFi band. Typically, if you're having WiFi performance issues using 5 GHz, the problem is unlikely to be your channel. There's simply much less interference in 5 GHz, so your connectivity issues likely stem from something else. In this scenario, it would be best to conduct a full WiFi site survey and create a heatmap of your wireless area.
How To Find the Best Wireless Channel for Your Network
While channels 1, 6, and 11 are typically considered the best channels to pick, this might not be true for your network. If you want to optimize your network for peak performance, you'll need to drill into the data and find out which channels are crowded in your area. You can do this with a wireless channel scanner.
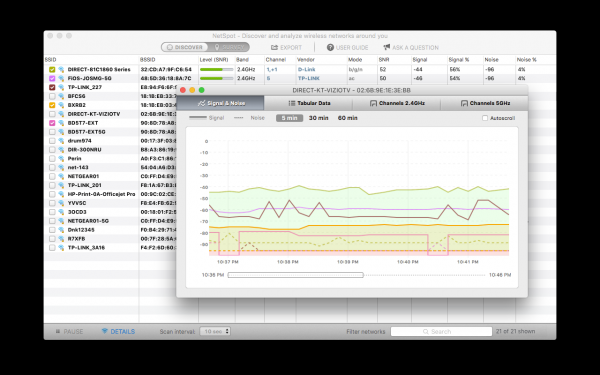
NetSpot's WiFi analyzer allows you to conduct a comprehensive WiFi site survey so you can determine exactly why your wireless network is underperforming. Here's how you can use NetSpot to find the best channel for your network:
Windows and macOS
You can download the desktop version of NetSpot for both Windows and macOS. Once you've downloaded and installed NetSpot, follow the steps below.
Launch NetSpot and click on the Discover tab in the top-left corner.
Find the Channel column and sort the WiFi networks by channel.
See which of the optimum channels (1, 6, 11) is being utilized the least.
Android
You can also use NetSpot's wireless channel scanner on Android mobile devices by following these steps:
Navigate to the Google Play Store and search for NetSpot.
Download the app.
Launch NetSpot.
Navigate to the Comparison tab to determine which channels are the least utilized in your network area.
iOS device users can either use NetSpot or Apple's native wireless network manager called AirPort Utility. You can download AirPort Utility from the App Store.
How To Change Wireless Channel
Once you've decided on a channel to use, it's time to program your router to that channel. The first thing you need to do is find your router's admin interface, which you can do by entering the IP address you find on your router. Once you're on the homepage for your router, navigate to WiFi settings. The exact steps will be different for different routers, but if you look for "settings" or "advanced settings," you should be able to find your WiFi channel preferences. From here, you simply pick the channel you want based on your results from the wireless channel scanner test.
Subscribe to Latin Post!
Sign up for our free newsletter for the Latest coverage!


